如何在 Ubuntu 22.04 上安装 Arkime Moloch 抓包工具
Arkime 是一款免费、开源、大规模索引数据包捕获和搜索工具,以 PCAP 格式存储和索引网络流量。 它也称为 Moloch,旨在跨多个集群系统部署,提供扩展能力以处理每秒数千兆位的流量。 Arkime 具有内置管理界面,可帮助您浏览、搜索和导出 PCAP。 您可以使用其他 PCAP 摄取工具来分析您的工作流程。
本教程将向您展示如何在 Ubuntu 22.04 上安装 Arkime 数据包捕获工具。
先决条件
- 运行 Ubuntu 22.04 的服务器。
- 服务器上配置了 root 密码。
入门
在开始之前,您需要将系统软件包更新到最新版本。 您可以使用以下命令更新它们:
apt-get update -y
更新所有软件包后,使用以下命令安装所需的依赖项:
apt-get install gnupg2 curl wget -y
接下来,您还需要将 Libssl 和 Libffi 库安装到您的系统中。 您可以通过运行以下命令下载并安装两者:
wget http://es.archive.ubuntu.com/ubuntu/pool/main/libf/libffi/libffi7_3.3-4_amd64.deb
wget http://archive.ubuntu.com/ubuntu/pool/main/o/openssl/libssl1.1_1.1.1f-1ubuntu2_amd64.deb
dpkg -i libffi7_3.3-4_amd64.deb
dpkg -i libssl1.1_1.1.1f-1ubuntu2_amd64.deb
ln -s /usr/lib/x86_64-linux-gnu/libssl.so.1.1 /usr/local/lib/
ln -s /usr/lib/x86_64-linux-gnu/libffi.so.7 /usr/local/lib/
安装所有软件包后,您可以继续下一步。
安装Elasticsearch
Arkime 使用 Elasticsearch 进行索引和搜索。 因此您的系统中必须安装 Elasticsearch。 默认情况下,最新版本的 Elasticsearch 不包含在 Ubuntu 默认存储库中。 因此,您需要将 Elasticsearch 存储库添加到您的系统中。
首先,使用以下命令添加 GPG 密钥:
wget -qO - https://artifacts.elastic.co/GPG-KEY-elasticsearch --no-check-certificate | apt-key add -
接下来,使用以下命令将 Elasticsearch 存储库添加到 APT:
echo "deb https://artifacts.elastic.co/packages/7.x/apt stable main" | tee -a /etc/apt/sources.list.d/elastic-7.x.list
接下来,使用以下命令更新存储库并安装 Elasticsearch 包:
apt-get update -y
apt-get install elasticsearch -y
安装 Elasticsearch 后,编辑 Elasticsearch 配置文件并设置 Java 内存:
nano /etc/elasticsearch/jvm.options
更改以下行:
-Xms500m
-Xmx500m
保存并关闭文件,然后使用以下命令启用 Elasticsearch 服务在系统重新引导时启动:
systemctl enable --now elasticsearch
默认情况下,Elasticsearch 监听端口 9200。您可以使用以下命令进行检查:
ss -antpl | grep 9200
您应该得到以下输出:
LISTEN 0      4096   [::ffff:127.0.0.1]:9200            *:*    users:(("java",pid=30581,fd=291))
LISTEN 0      4096                [::1]:9200         [::]:*    users:(("java",pid=30581,fd=290))
您还可以使用以下命令检查 Elasticsearch:
curl http://localhost:9200
您应该得到以下输出:
{
  "name" : "ubuntu2204",
  "cluster_name" : "elasticsearch",
  "cluster_uuid" : "6QiUfVa4Q9G8lxHjuVLjUQ",
  "version" : {
    "number" : "7.17.5",
    "build_flavor" : "default",
    "build_type" : "deb",
    "build_hash" : "8d61b4f7ddf931f219e3745f295ed2bbc50c8e84",
    "build_date" : "2022-06-23T21:57:28.736740635Z",
    "build_snapshot" : false,
    "lucene_version" : "8.11.1",
    "minimum_wire_compatibility_version" : "6.8.0",
    "minimum_index_compatibility_version" : "6.0.0-beta1"
  },
  "tagline" : "You Know, for Search"
}
至此,Elasticsearch已安装并运行。 您现在可以继续下一步。
安装和配置 Arkime
首先,使用以下命令下载最新版本的 Arkime:
wget https://s3.amazonaws.com/files.molo.ch/builds/ubuntu-20.04/arkime_3.4.2-1_amd64.deb
下载软件包后,使用以下命令安装下载的软件包:
apt install ./arkime_3.4.2-1_amd64.deb
安装 Arkime 后,运行以下命令进行配置:
/opt/arkime/bin/Configure
系统将要求您指定网络接口,如下所示:
Found interfaces: lo;eth0;eth1
Semicolon ';' seperated list of interfaces to monitor [eth1] eth0
输入您的网络接口名称并按 Enter 键继续。 配置完成后,您应该得到以下输出:
Install Elasticsearch server locally for demo, must have at least 3G of memory, NOT recommended for production use (yes or no) [no] no
Elasticsearch server URL [http://localhost:9200]
Password to encrypt S2S and other things, don't use spaces [no-default] password
Arkime - Creating configuration files
Installing systemd start files, use systemctl
Arkime - Installing /etc/logrotate.d/arkime to rotate files after 7 days
Arkime - Installing /etc/security/limits.d/99-arkime.conf to make core and memlock unlimited
Download GEO files? You'll need a MaxMind account https://arkime.com/faq#maxmind (yes or no) [yes] no
Arkime - NOT downloading GEO files

Arkime - Configured - Now continue with step 4 in /opt/arkime/README.txt

 4) The Configure script can install elasticsearch for you or you can install yourself
      systemctl start elasticsearch.service
 5) Initialize/Upgrade Elasticsearch Arkime configuration
  a) If this is the first install, or want to delete all data
      /opt/arkime/db/db.pl http://ESHOST:9200 init
  b) If this is an update to a moloch/arkime package
      /opt/arkime/db/db.pl http://ESHOST:9200 upgrade
 6) Add an admin user if a new install or after an init
      /opt/arkime/bin/arkime_add_user.sh admin "Admin User" THEPASSWORD --admin
 7) Start everything
      systemctl start arkimecapture.service
      systemctl start arkimeviewer.service
 8) Look at log files for errors
      /opt/arkime/logs/viewer.log
      /opt/arkime/logs/capture.log
 9) Visit http://arkimeHOST:8005 with your favorite browser.
      user: admin
      password: THEPASSWORD from step #6

If you want IP -> Geo/ASN to work, you need to setup a maxmind account and the geoipupdate program.
See https://arkime.com/faq#maxmind

Any configuration changes can be made to /opt/arkime/etc/config.ini
See https://arkime.com/faq#moloch-is-not-working for issues

Additional information can be found at:
  * https://arkime.com/faq
  * https://arkime.com/settings
完成后,您可以继续下一步。
初始化Elasticsearch Arkime配置
接下来,您需要初始化 Elasticsearch Arkime 配置。 您可以使用以下命令来完成此操作:
/opt/arkime/db/db.pl http://localhost:9200 init
接下来,使用以下命令为 Arkime 创建管理员用户帐户:
/opt/arkime/bin/arkime_add_user.sh admin "Moloch SuperAdmin" password --admin
接下来,使用以下命令更新 Geo 数据库:
/opt/arkime/bin/arkime_update_geo.sh
完成后,您可以继续下一步。
启动和管理 Arkime 服务
Arkime 由三个组件组成:capture、viewer 和 elasticsearch。 因此,您需要启动每个组件的服务。
您可以使用以下命令启动 Arkimecapture 和 Arkimeviewer 服务并使其在系统重新引导时启动:
systemctl enable --now arkimecapture
systemctl enable --now arkimeviewer
您现在可以使用以下命令检查这两个服务的状态:
systemctl status arkimecapture arkimeviewer
您应该得到以下输出:
? arkimecapture.service - Arkime Capture
     Loaded: loaded (/etc/systemd/system/arkimecapture.service; enabled; vendor preset: enabled)
     Active: active (running) since Mon 2022-08-15 03:55:10 UTC; 1min 0s ago
    Process: 33704 ExecStartPre=/opt/arkime/bin/arkime_config_interfaces.sh -c /opt/arkime/etc/config.ini -n default (code=exited, status=0/S>
   Main PID: 33724 (sh)
      Tasks: 7 (limit: 2242)
     Memory: 213.2M
        CPU: 806ms
     CGroup: /system.slice/arkimecapture.service
             ??33724 /bin/sh -c "/opt/arkime/bin/capture -c /opt/arkime/etc/config.ini  >> /opt/arkime/logs/capture.log 2>&1"
             ??33725 /opt/arkime/bin/capture -c /opt/arkime/etc/config.ini

Aug 15 03:55:09 ubuntu2204 systemd[1]: Starting Arkime Capture...
Aug 15 03:55:10 ubuntu2204 systemd[1]: Started Arkime Capture.

? arkimeviewer.service - Arkime Viewer
     Loaded: loaded (/etc/systemd/system/arkimeviewer.service; enabled; vendor preset: enabled)
     Active: active (running) since Mon 2022-08-15 03:08:39 UTC; 47min ago
   Main PID: 31759 (sh)
      Tasks: 12 (limit: 2242)
     Memory: 56.7M
        CPU: 2.127s
     CGroup: /system.slice/arkimeviewer.service
             ??31759 /bin/sh -c "/opt/arkime/bin/node viewer.js -c /opt/arkime/etc/config.ini  >> /opt/arkime/logs/viewer.log 2>&1"
             ??31760 /opt/arkime/bin/node viewer.js -c /opt/arkime/etc/config.ini

Aug 15 03:08:39 ubuntu2204 systemd[1]: Started Arkime Viewer.
您可以使用以下命令检查查看器日志:
tail -f /opt/arkime/logs/viewer.log
您现在可以使用以下命令检查捕获日志:
tail -f /opt/arkime/logs/capture.log
您应该看到以下输出:
Aug 15 03:57:20 http.c:389 moloch_http_curlm_check_multi_info(): 2/3 ASYNC 201 http://localhost:9200/arkime_dstats/_doc/ubuntu2204-1408-5 804/159 0ms 20ms
Aug 15 03:57:20 http.c:389 moloch_http_curlm_check_multi_info(): 1/3 ASYNC 200 http://localhost:9200/arkime_stats/_doc/ubuntu2204?version_type=external&version=66 798/157 0ms 24ms
Aug 15 03:57:22 http.c:389 moloch_http_curlm_check_multi_info(): 1/3 ASYNC 200 http://localhost:9200/_bulk 715/221 0ms 10ms
Aug 15 03:57:22 http.c:389 moloch_http_curlm_check_multi_info(): 1/3 ASYNC 200 http://localhost:9200/arkime_stats/_doc/ubuntu2204?version_type=external&version=67 805/158 0ms 12ms
Aug 15 03:57:24 http.c:389 moloch_http_curlm_check_multi_info(): 1/3 ASYNC 200 http://localhost:9200/_bulk 1471/253 0ms 24ms
Aug 15 03:57:24 http.c:389 moloch_http_curlm_check_multi_info(): 1/3 ASYNC 200 http://localhost:9200/arkime_stats/_doc/ubuntu2204?version_type=external&version=68 806/157 0ms 18ms
Aug 15 03:57:25 http.c:389 moloch_http_curlm_check_multi_info(): 1/3 ASYNC 201 http://localhost:9200/arkime_dstats/_doc/ubuntu2204-1409-5 808/159 0ms 10ms
访问 Arkime 网页界面
此时,Arkime 已启动并监听 8005 端口。您可以使用以下命令进行检查:
ss -antpl | grep 8005
您应该得到以下输出:
LISTEN 0 511 *:8005 *:* users:(("node",pid=11362,fd=20))
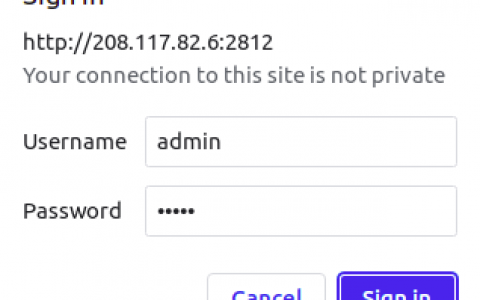
现在,打开 Web 浏览器并使用 URL http://your-server-ip:8005 访问 Arkime Web 界面。 系统将要求您提供管理员用户名和密码,如下所示:

提供您的管理员用户名、密码,然后单击“登录”按钮。 您应该在以下页面中看到 Arkime 仪表板:

结论
恭喜 至此,您已经在Ubuntu 22.04服务器上成功安装并配置了Arkime抓包工具。 您现在可以探索 Arkime 的更多功能并开始捕获数据包。 如果您有任何疑问,请随时问我。
资讯来源:由a0资讯编译自THECOINREPUBLIC。版权归作者A0资讯所有,未经许可,不得转载

